How to create a custom block
Creating a basic custom module in Drupal involves several steps. Here, I'll walk you through creating a simple module that adds a custom block to your site. This example assumes you have a basic understanding of Drupal's file structure and where to place the files.
Here are some essential steps you need to follow to get started with creating a custom module in Drupal
Step 1: Create a custom folder for your module
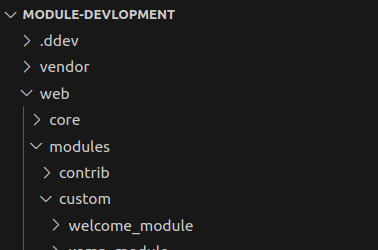
First, we need to create a custom module under ‘web/modules/custom’ folder. We will name the folder as welcome_module.

Some important rules to follow before you choose a name for your module:
- It must start with a letter.
- It must contain only lowercase letters, digits, and underscores.
- It must not contain any spaces.
- It must not be longer than 50 characters.
- It must be unique. Your module should not have the same short name as any other module, theme, theme engine, or installation profile you will use on the site.
It should not be any of the reserved terms: src, lib, vendor, assets, CSS, files, images, js, misc, templates, includes, fixtures, or Drupal.
Step 2: Create a .info.yml file
We have to create a yaml file with the machine name of our module for Drupal to be able recognize the module. I’ll create a yaml file like this welcome_module.info.yml. Your .info.yml file holds the module information, compatibility, and dependencies information. The .info.yml file is created to notify Drupal about its existence in the system and provide information for the Drupal Web UI administration pages.
Here is our welcome_module.info.yml file created under "welcome" directory we created in Step 1.
name: Welcome Module
type: module
description: 'First Custom Drupal 10 Module.'
package: Custom
version: 1.0
core_version_requirement: ^10 || ^11
name: Welcome Module (The name displayed on the modules list in Drupal)
type: module - (Declaring that this is a module or theme)
description: Custom Example Drupal 9 Module (Description of the module)
package: Custom - (Mentioning that this is a custom module)
version: 1.0 - (Module version)
core_version_requirement: ^8 || ^9 - (Drupal version)
Step 3: Create a routing.yml file:
Next step is to add a welcome_module.routing.yml file under the "welcome" directory:
The .routing.yml file is created to define routes. Each route is defined as a machine name in the form of my_module_name.route_name (for example welcome_module.welcome)
welcome_module.welcome:
 path: '/welcome/page'
 defaults:
   _controller: '\Drupal\welcome_module\Controller
\WelcomeController::welcome'
   _title: 'Welcome to My Module in Drupal 10'
 requirements:
   _permission: 'access content'
The first line is the route name [welcome_module.my_welcome].
Under path, we specify the URL path we want this route to register. This is the URL to the route.
Under defaults, we have two things: the _controller which references a method on the WelcomeController class and the default page title (_title).
Under requirements, we specify the permission of the accessing. User needs to have to be able to view the page.
Step 4: Create a Controller
Controllers are responsible for controlling the flow of the application and its logic. Controllers process user requests and determine the appropriate course of action. They can perform one or more actions and return different results to a particular request. The controller in our module is responsible for generating the body and sending it back to the page.
Create a folder "modules/custom/welcome_module/src/Controller". In this folder, create a file named "WelcomeController.php" with the following content:
<?php
namespace Drupal\welcome_module\Controller;
class WelcomeController {
 public function welcome() {
   return array(
     '#markup' =----> 'Welcome to our Website.'
   );
 }
}
Now Login to your Drupal site and enable your module. To check if it functions properly, visit the path you specified in your routing file, that is /welcome/page. If you get the ‘Page Not Found’ error, then clear the cache by navigating to admin->configuration->performance. Check again and it should function properly this time.


